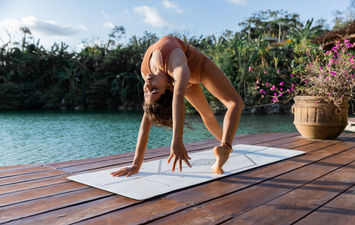
Dolphin is a variation of Downward Facing Dog in which you bend your elbows and bring your forearms down to the mat. It provides a convenient alternative to Down Dog for people who need to avoid putting pressure on their wrists. Dolphin is also worth practising for its own benefits even if your wrists are fine because it helps build strength and flexibility in the shoulders and back in preparation for inversions like Headstand and Forearm Stand.
Benefits of Dolphin Pose
- Stretches the hamstrings and calves
- Opens and strengthens the shoulders and upper back
- Improves arm and core strength
Instructions:
- Come to a hands and knees kneeling position at the centre of your mat.
- Slide your palms forward to lower your elbows to the mat so that you are on your knees and forearms with your shoulders stacked directly over your elbows. The forearms should be parallel and shoulders’ distance apart.
- Press strongly into your contact points with the mat (fingers, palms, forearms, and elbows) to engage the muscles around your shoulder girdle and lift your chest away from the floor.
- Curl your toes under and lift your hips to a Downward Facing Dog position.
- When you take your hips up and back, your shoulders will also naturally shift back.
- Keep actively pressing down through your arms to lift your chest.
- Let your head hang easy, though it should not touch the floor.
- If you are working toward Forearm Stand (Pincha Mayurasana), you may want to begin walking your feet in bit by bit, eventually bringing the shoulders back over the elbows and the hips closer to over the shoulders.
- You can also practice lifting your head to bring your gaze to the floor between the palms once you have walked your feet in as close as possible.
- Lifting one leg at a time will start to give you the feeling of transferring your weight into your forearms.
Variations and Use of Props

- Instead of having the forearms parallel and palms flat, you can clasp your hands, which will bring your forearms into V shape (much like the position you take for a Headstand). Tucking your bottom pinky in will make this more comfortable when you begin to put pressure on your hands.
- If it’s difficult to keep your forearms parallel because your elbows want to splay outward, a strap and/or a block can help. Adjust a strap so that it fits snugly around your upper arms just above the elbows to maintain their width at shoulders’ distance apart. You can press your arms outward into the strap for additional stability.
- Place a block longwise between your hands. Position your thumb and forefinger on the mat around the bottom edges of the block to make an L shape. If you want to be able to put some pressure into the block, set yourself up so that the long side of the block is resting against a wall.
- If you have sensitive elbows, use a Liforme Yoga Pad under them for extra cushioning and support.

For more practice inspiration, check out these other variations of Downward Facing Dog!