Although it has been the source of sitcom laughs and lol-worthy memes, sciatica is no joke. Its pervasiveness in popular culture can be attributed to the fact that 40% of people are affected by sciatic nerve pain at some point in their lives, according to the Cleveland Clinic.
Some injuries require rest, but sciatica responds well to the right kinds of movement. Yoga poses that strengthen the spinal support muscles and stretch the buttocks and hamstrings can alleviate your symptoms and bring long-term relief when practised regularly.
What Is Sciatica?
Sciatica is an irritation of the sciatic nerves, which run from both sides of your lower spine through your buttocks and down the back of each leg to the heels.
Nerve pain is tricky, sometimes manifesting as a burning or tingling sensation or numbness and other times as intense pain. Sciatica is often caused by an impingement in the lower back or buttocks but can follow the path of the nerves down one or both of your legs.
Diagnosing the cause of your sciatic pain can help determine the best way to treat it, so consult with a health care professional to find out what kinds of activity will best support your recovery.
Can Yoga Help Sciatica?
Yes, specific yoga postures can help relieve sciatic pain, especially if it is caused by a herniated spinal disc or piriformis syndrome. Building up your back muscles and stretching your hamstrings is recommended for herniated disc recovery while opening the hips improves the mobility of the piriformis, a small muscle that connects your sacrum to the top of your femur.
Standing and seated forward bends are often counter-indicated for people with sciatica, so avoid them if you are having a flare-up. If you do find relief from yoga, it’s important to keep up your practice after your pain subsides to help prevent a reoccurrence.
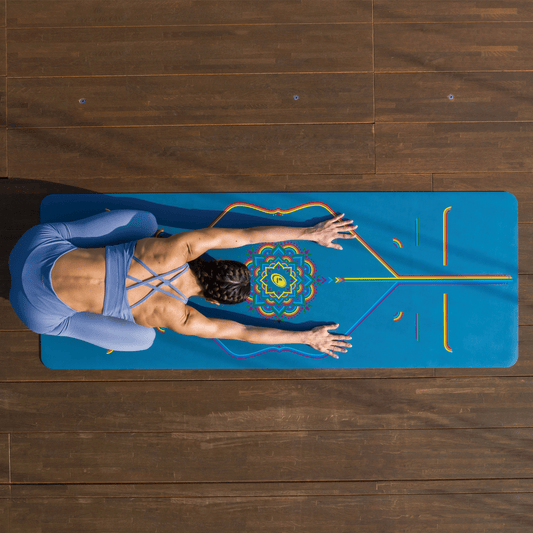
The Best Yoga Poses for Sciatica Relief
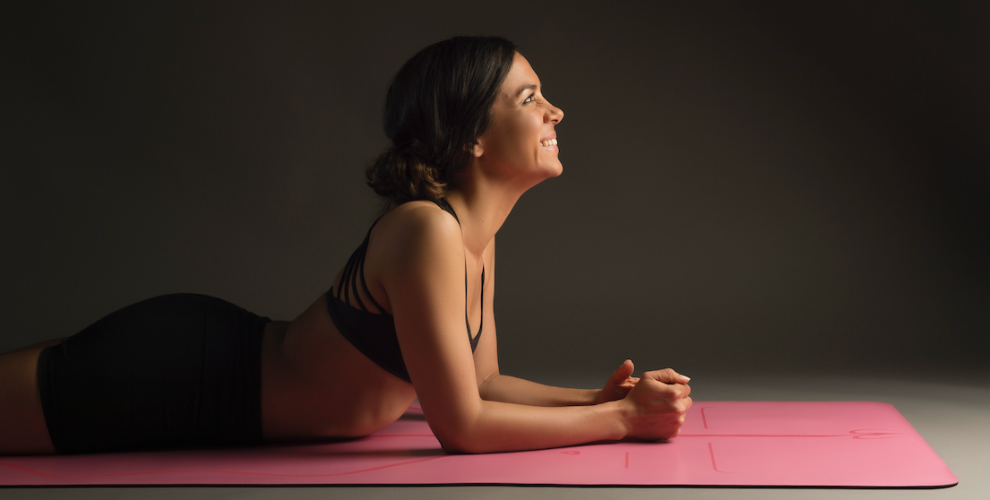
Cobra (Bhujangasana)
Sanskrit Meaning: Bhuja (Cobra)
Yoga Level: Beginner
Pose Type: Prone
Benefits: Strengthens the back muscles.
Step-by-Step:
- Lie down on your belly with your palms flat under your shoulders and your elbows bent and hugging your sides.
- Engage your glutes to press your pelvis down into your mat.
- Press into the tops of your feet to activate your legs, which lifts your knees away from the floor.
- On an inhalation, use your back muscles to lift your head and chest off your mat without pressing into your palms.
- On your exhalation, release to the floor.
- Repeat the pose twice more.
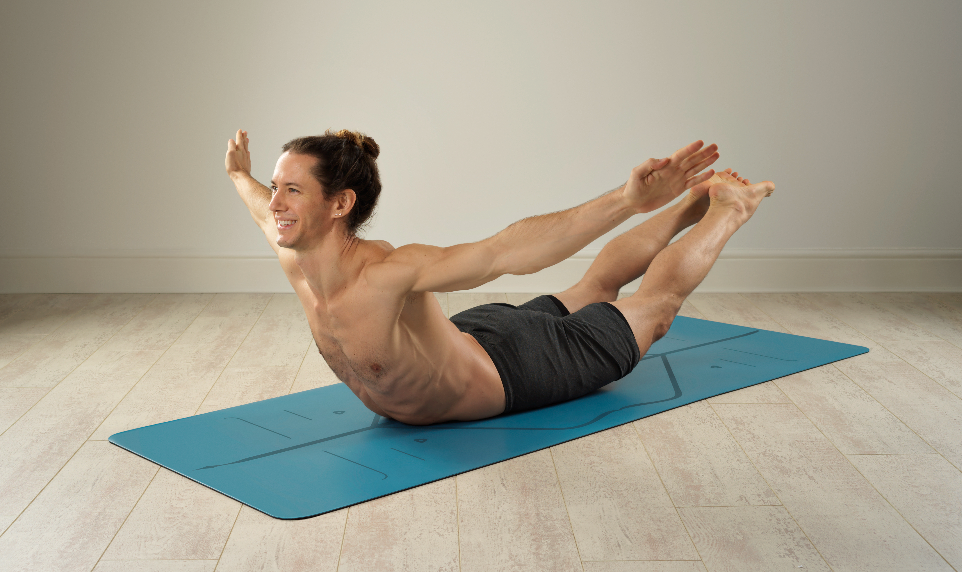
Locust Pose (Salabhasana)
Sanskrit Meaning: Salabha (Locust)
Yoga Level: Intermediate
Pose Type: Prone
Benefits: Strengthens the back, buttocks, and legs.
Step-by-Step:
- Begin by lying on your belly with your arms alongside your body and your forehead on the mat.
- Engage your butt to press your pelvis down, anchoring it to the mat.
- On an inhalation, lift your chest, arms, and feet away from the floor, keeping your legs straight.
- On an exhalation, release everything back down.
- Repeat two more times.
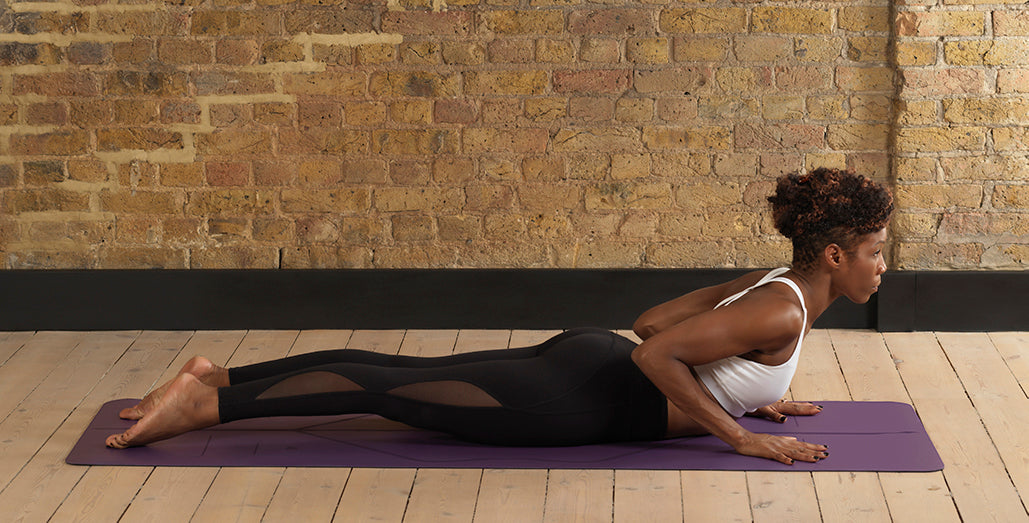
Sphinx Pose
Yoga Level: Beginner
Pose Type: Prone
Benefits: Brings the spine into gentle extension.
Step-by-Step:
- Lie down on your belly with your elbows under your shoulders and upper arms perpendicular to your mat.
- Bring your forearms parallel to each other and press your palms and forearms into the floor to draw your shoulder down and lengthen your neck.
- Press your pelvis and the tops of your feet down.
- Stay five to ten breaths in this position.

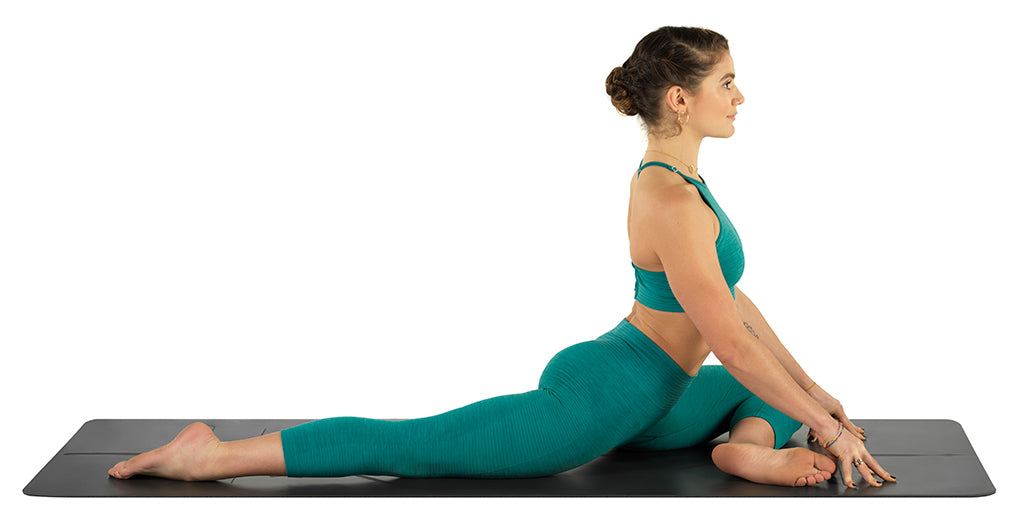
Child’s Pose (Balasana)
Sanskrit Meaning: Bala (Child)
Yoga Level: Beginner
Pose Type: Kneeling
Benefits: Stretches the back and hips.
Step-by-Step:
- Begin in a kneeling position with your knees wide and your big toes touching.
- Bring your hands to the floor between your knees.
- Slide your hands forward to lower your upper body to the floor. You can take a bolster or several folded blankets under your torso for more support.
- Rest your forehead on your mat or boster. If you prefer, you can bring your arms alongside your body instead of reaching them forward.
- Stay five to ten breaths.
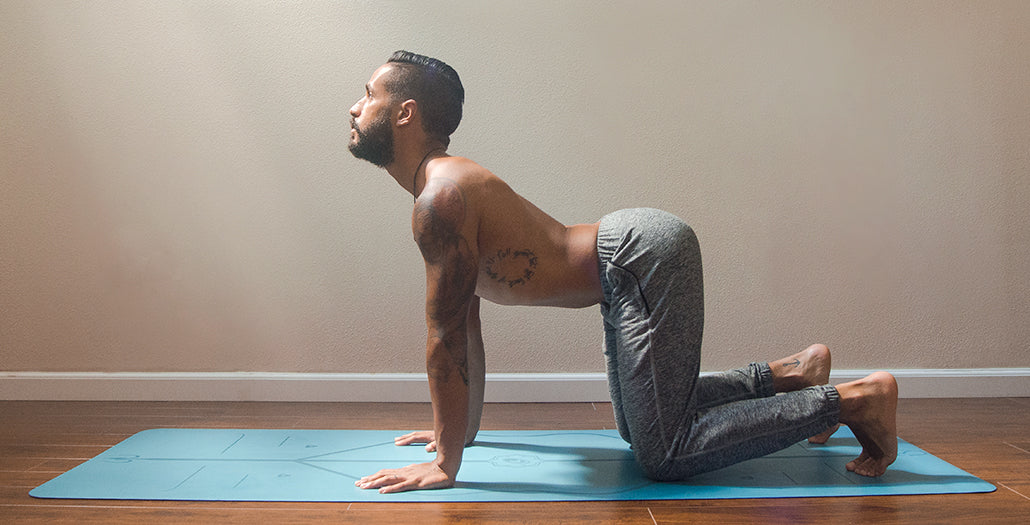
Cat-Cow Stretch (Marjaryasana-Bitilasana)
Sanskrit Meaning: Marjary (Cat) Bitil (Cow)
Yoga Level: Beginner
Pose Type: Kneeling
Benefits: Strengthens and stretches the core and back muscles. Moves the pelvis between anterior to posterior positions and the spine from extension to flexion.
Step-by-Step:
- Begin on your hands and knees with your shoulders over your wrists and your knees over your ankles.
- On an inhalation, tilt your pelvis forward to lift your tail, drop your belly, and raise your head.
- On your next exhalation, tuck your tail to round your spine and lower your head.
- Gently hug your navel in throughout.
- Repeat this cycle five to ten times.
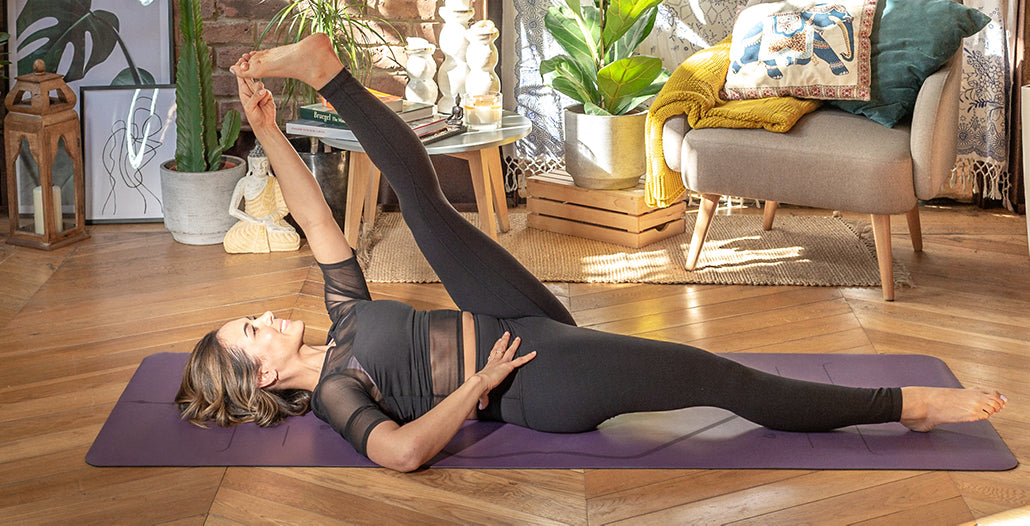
Reclined Hand to Big Toe Pose (Supta Padangustasana)
Sanskrit Meaning: Supta (Reclined) Padangusta (Big Toe)
Yoga Level: Beginner
Pose Type: Supine
Benefits: Stretches the hamstrings and calves.
Step-by-Step:
- Lie down on your back with both legs outstretched.
- Hold the ends of a yoga strap in each hand. If you don’t have a strap, you can use a belt, a towel, or even a t-shirt.
- Draw your right knee into your chest and loop your strap around the ball or instep of your right foot.
- Extend your right leg straight up toward the ceiling while holding onto both ends of the strap. It’s ok to bend your knee slightly if necessary.
- Keep your shoulders and head relaxed on the floor.
- After five to ten breaths, switch legs.
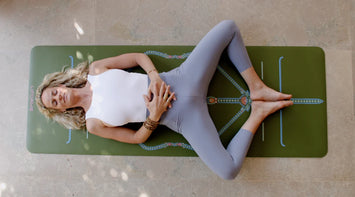
Wind Relieving Pose (Pavanamuktasana)
Sanskrit Meaning:Pavana (Wind) Mukta (Liberating)
Yoga Level: Beginner
Pose Type: Supine
Benefits: Gently stretches the lower back, hips and glutes.
Step-by-Step:
- Lie on your back.
- Hug both your knees into your chest. You may also want to try hugging one knee at a time while keeping the opposite leg extended.
- To intensify the stretch, curl your forehead up to meet your knees.

Eye of the Needle Pose (Sucirandhrasana)
Sanskrit Meaning: Suci (Needle) Randra (Opening)
Also Known As: Reclined Pigeon
Yoga Level: Beginner
Pose Type: Supine
Benefits: Hip-opener
Step-by-step:
- Lie on your back with both legs bent, knees pointing upwards, and the soles of your feet flat on the mat.
- Hug your right knee into your chest, then cross your right ankle over to rest atop your left thigh near the knee. Your right knee will point out toward the right.
- f you want to intensify the stretch, lift your left foot off the floor, bringing your left knee toward your chest.
- Reach your right hand through the opening between your legs and your left hand around the left side of your body to clasp the hands together behind your left thigh. Draw your left leg closer to your chest if that feels good.
- Stay five to ten breaths and then switch sides.

Bridge Pose (Setu Bandhasana)
Sanskrit Meaning: Setu (Bridge) Bandha (Lock)
Yoga Level: Beginner
Pose Type: Supine Backbend
Benefits: Stretches the back, abdomen, and shoulders. Strengthens the back and glutes.
Step-by-Step:
- Lie down on your back with your knees bent toward the ceiling and the soles of your feet flat on the floor.
- With your arms by your sides, reach down and make sure you can graze your heels with your fingertips.
- On an inhalation, press into the soles of your feet and engage your glutes to lift your hips away from the floor.
- Clasp your hands behind your back and tuck your shoulders under your body one at a time to lift your chest.
- Keep lifting your hips for five to ten breaths, then release your hands and lower your hips to the floor on an exhalation. After several breaths, repeat the pose twice more.
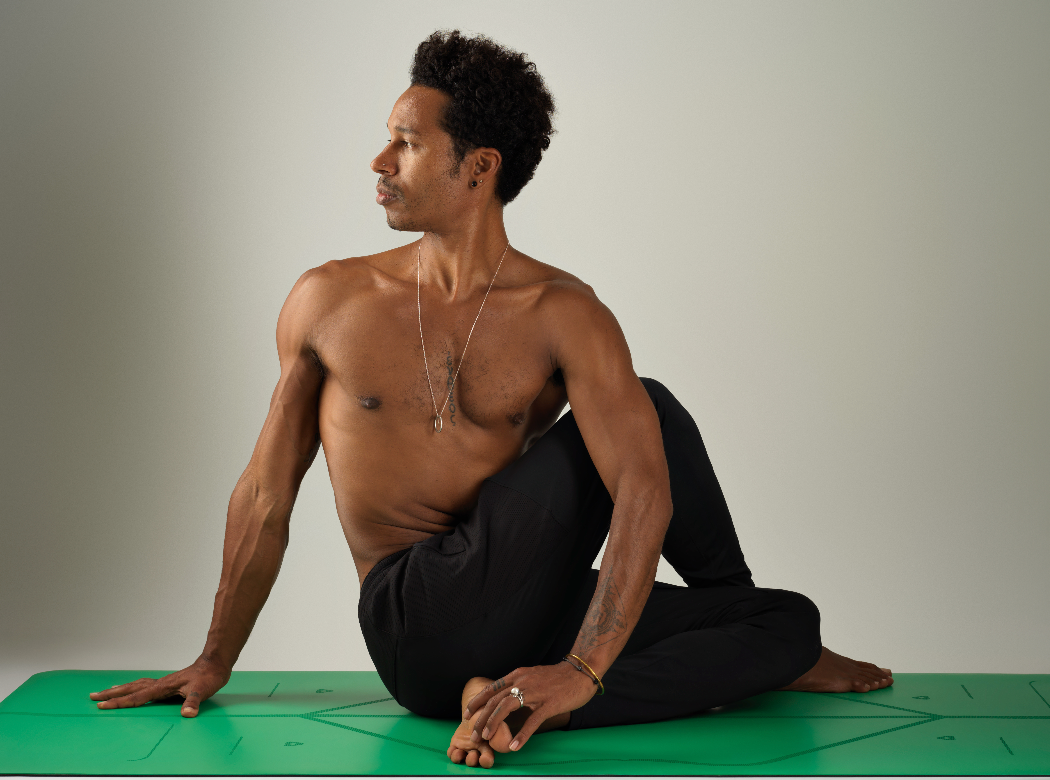
Half Lord of the Fishes Pose (Ardha Matsyendrasana)
Sanskrit Meaning: Ardha (Half) Matsyendra (Lord of the Fishes)
Also Known As: Seated Spinal Twist
Yoga Level: Beginner
Pose Type: Seated
Benefits: Stretches the back, abdominal, and piriformis muscles.
Step-by-Step:
- Sit in an easy cross-legged position, taking a blanket under your butt if it makes it easier to sit up straight.
- Hug your right knee into your chest, then place the sole of your right foot on the mat outside your left thigh.
- Move your left knee toward your midline and bring the left foot to the outside of your right buttock. If this position isn’t comfortable, try extending your left leg out straight in front of you instead.
- Begin to twist your torso gently to the right, taking your left elbow outside your right knee and your right hand to the mat behind your back.
- Stay five to ten breaths and then do the other side.
Pigeon Pose (Eka Pada Rajakapotasana) Prep
Sanskrit Meaning: Eka (One) Pada (Foot) Raja (King) Kapota (Pigeon)
Yoga Level: Beginner
Pose Type: Seated
Benefits: Opens the pelvic and buttock muscles. Stretches the hamstrings and quads.
Step-by-Step:
- Begin in hands and knees position.
- Move your right knee to the outside of your right hand.
- Bring your right foot across toward your left hand.
- Move your left knee toward the back of your mat, extending your left leg straight behind you.
- Use a bolster, block, or blanket under the right buttock for support and to keep your hip points level.
- To intensify the stretch, fold your torso over your right leg.
- After five to ten breaths, come out and do the other side.
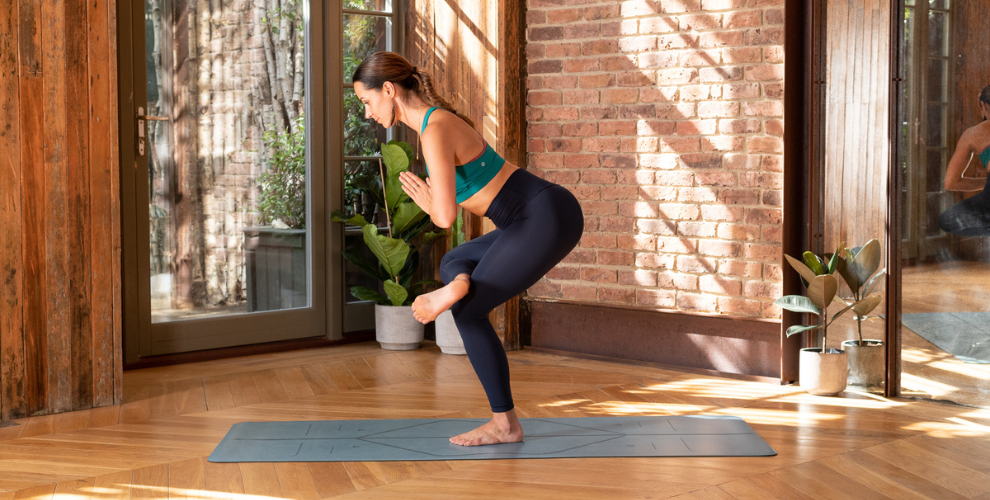
One-Legged Chair Pose (Eka Pada Utkatasana)
Sanskrit Meaning: Eka (One) Pada (Foot) Utkata (Powerful)
Also Known As: Figure Four Position
Yoga Level: Intermediate
Pose Type: Standing
Benefits: Hip opener, improves balance, strengthens your abs and legs
Step-by-Step:
- Come into Chair Pose with your hands in Anjali mudra at your heart.
- Without changing your hip position, shift your weight into your right leg and lift your left foot off the floor.
- Place your left ankle on top of your right thigh. Your left knee will stick out to the left.
- Balance in this position for several breaths, then do the other side.

Downward Facing Dog (Adho Mukha Svanasana)
Sanskrit Meaning: Adho (Down) Mukha (Face) Svana (Dog)
Yoga Level: Beginner
Pose Type: Standing
Benefits: Stretches and strengthens the whole body
Step-by-Step:
- Begin on your hands and knees with your shoulders stacked over your wrists.
- Curl your toes under and press into your hands to lift your hips up and back, straightening your legs.
- Continue to press into your hands as you point your butt toward the ceiling and sink your heels toward the floor.
- Soften your knees slightly if you need to.
- Stay five to ten breaths.
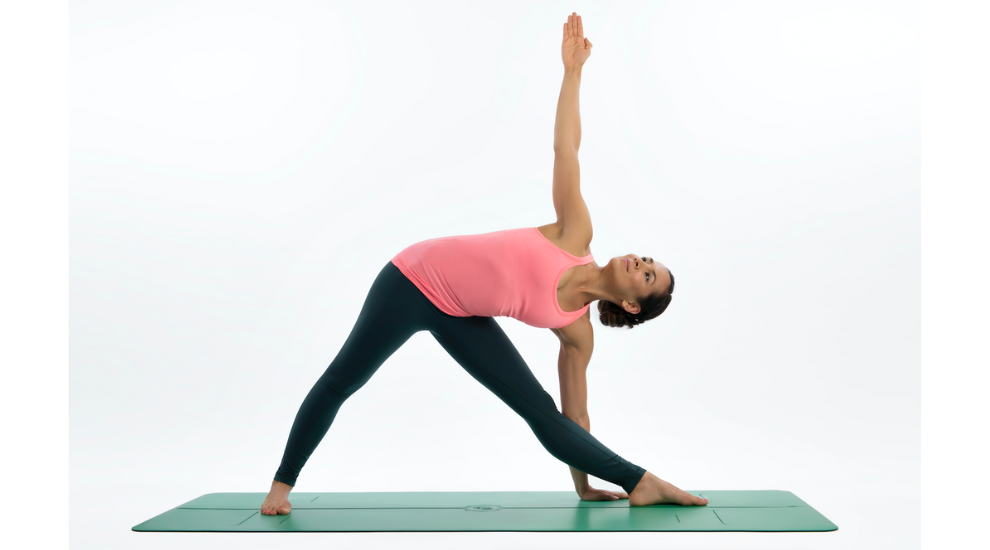
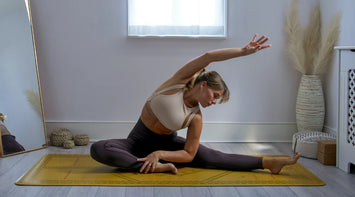
Triangle Pose (Trikonasana)
Sanskrit Meaning:Trikona (Triangle)
Yoga Level: Beginner
Pose Type: Standing
Benefits: Side and hamstring stretch. Strengthens the legs.
Step-by-Step:
- Begin standing with your right foot at the front of your mat and your left foot turned out 90 degrees at the back of your mat.
- Use the Central Line to line up your front heel with your back arch. Your hips will be in the open position, facing the side of your mat.
- Lift your arms to shoulder height, parallel to the floor, with the right arm forward and the left arm back.
- Draw your right arm forward as far as possible, then lower your right hand to your right leg or a block.
- Take your left arm straight up and open your chest to the left.
- Stay five to ten breaths and then do the other side.

Half Moon Pose (Ardha Chandrasana)
Sanskrit Meaning: Ardha (Half) Chandra (Moon)
Yoga Level: Intermediate
Pose Type: Standing
Benefits: Strengthens the legs, glutes, and abs. Improves hip mobility. Stretches the hamstrings.
Step-by-Step:
- Begin in Triangle Pose with your right leg forward (see above) and your left hand on your left hip.
- Bend your right knee slightly as you take your right hand to the floor or a block about a foot in front of your right foot. At the same time, lift your left foot off the floor.
- Restraighten your right leg and lift your left leg parallel to the floor. Keep your left toes pointing toward the left side of the room and flex that foot strongly.
- Open your left arm toward the ceiling and turn your gaze toward your left hand.
- Stay for five to ten breaths and then repeat standing on your other leg.
Keep Up the Good Work
It may not be necessary, or even desirable, to do all of these poses, since everyone’s condition is slightly different. Once you find the ones that work for you, be sure to incorporate them into your exercise routine to help prevent your sciatica from coming back.