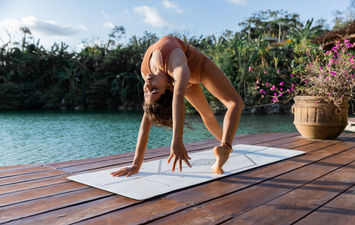
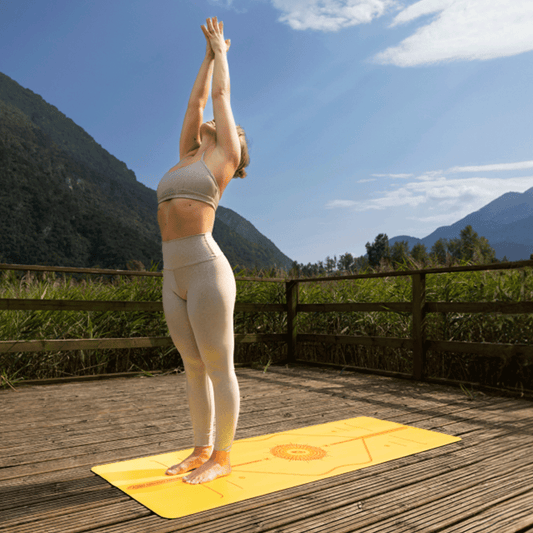
If you want to get more toned, yoga can help. Yoga builds lean muscle through bodyweight strength training, with the added benefits of improving your flexibility and relieving stress. The type and intensity of yoga you do are going to affect your results, as well as, of course, consistency. We’ve got 9 recommendations for toning yoga poses and ways to practice them that will amplify their strength-building potential.
What Does Toning Mean?
Toning occurs when your muscles get stronger and become more defined. It’s less about bulk and more about sculpting. Body weight exercises, especially when done with dynamic repetition or long hold times, are a good way to build strength. Moving in ways that raise your heart rate, lifting weights, and modifying your diet can also contribute to a more toned appearance.
Can You Use Yoga to Strength Train?
Yes, the more physical, intense styles of yoga do build strength. If changing your appearance is your primary motivation, yoga is not the fastest way to chiseled muscles, but it does have many other advantages. Yoga is a holistic practice that improves flexibility, balance, and strength simultaneously and engages the mind-body connection. If you do yoga regularly over time, you will see improvement in your arm, leg, abdominal, gluteal, and back strength. Yoga works very well in a fitness regime that also includes other types of exercise, like cardio and weight training.
The Best Yoga Poses for Body Toning

Plank Pose
Yoga Level: Beginner
Pose Type: Arm Support
Why this pose: A classic plank is a great way to improve your arm and ab strength.
Amp it up: Challenge yourself to hold your plank for a minute or longer.
Step-by-Step:
- Begin on your hands and knees with your shoulders directly over your wrists and your toes tucked.
- Straighten your legs one at a time toward the back of your mat.
- Don’t let your hips sag or your butt stick up. Aim for a straight line from the crown of your head to your heels.
- Gradually increase your hold time.
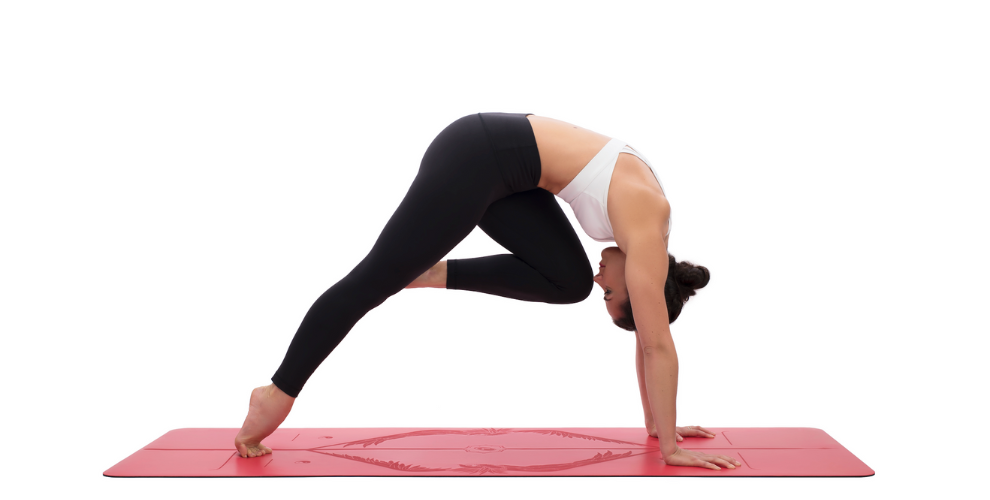
Plank Variation (Knee to Nose)
Yoga Level: Intermediate
Pose Type: Arm Support
Why this pose: Add this variation to your Plank routine for even more arm and ab toning.
Amp it up: Repeat the pose three or more times on each side.
Step-by-Step:
- Begin in a Downward Facing Dog Split with your right leg lifted and your hips squared to face the floor.
- On an inhalation of breath, move your shoulders forward over your wrists, tuck your chin, and bend your right leg as you hug your right knee up and in toward your chest.
- On an exhalation, push back to a Down Dog Split.
- Repeat this motion twice more before switching to the left leg.

Side Plank (Vasisthasana)
Sanskrit Meaning: Vasistha (An ancient poet and sage)
Yoga Level: Intermediate
Pose Type: Arm Support
Why this pose: Are you getting the feeling that planks are great for toning? A Side Plank requires arm strength and balance, so it’s also good for the abs.
Amp it up: Try doing a few leg lifts on each side.
Step-by-Step:
- From Plank, shift your weight to your right hand as you turn to face the left side of the room and roll to the outer edge of your right foot.
- Stack your left foot on top of your right foot or stagger the feet for more stability. Either way, flex both feet.
- Open your left arm toward the ceiling.
- Stay several breaths. Try lifting your left leg a few times, then switch to the other side.

Upward Facing Plank (Purvottanasana)
Sanskrit Meaning: Purva (Front) Uttana (Intense Stretch)
Yoga Level: Intermediate
Pose Type: Arm Support
Why this pose: One last Plank variation. This one works your arms, particularly the triceps, plus your hamstrings and back.
Amp it up: Go for a longer hold or repeat the posture several times.
Step-by-Step:
- Come to sit on your mat in Staff Pose with your legs outstretched in front and your palms flat on the outside of each hip.
- Press into your hands and heels to lift your hips so there is a straight line from your sternum to your toes.
- Use your glutes to keep your hips up.
- Tuck your chin or release your head back.
- Hold for a count of ten and then lower your butt to the floor.

Four-Limbed Staff Pose (Chaturanga Dandasana)
Sanskrit Meaning: Chatur (Four) Anga (Limb) Danda (Staff)
Yoga Level: Intermediate
Pose Type: Arm Support
Why this pose: Chaturanga is a yoga version of a push-up, so it’s great for toning your arms.
Amp it up: Chaturanga push-ups are a thing. See if you can knock out a few every time you move through a Vinyasa.
Step-by-Step:
- Begin in Plank Pose.
- Shift forward onto your tiptoes so your shoulders are in front of your wrists. This important step sets up your alignment for the next step.
- Bend your elbows straight back to lower. Stop when your upper arms are parallel to the floor. Don’t let your shoulders come below the level of your elbows.
- Hold the low Plank position with your elbows hugging your sides for a few seconds or longer if you can.
- Press into your hands to straighten your arms and return to a Plank position.
- Repeat this process several more times to build arm strength.

Bridge Pose (Setu Bandhasana)
Sanskrit Meaning: Setu (Bridge) Bandha (Lock)
Yoga Level: Beginner
Type of Pose: Supine Backbend
Why this pose: Bridge tones the glutes, thighs, and abs.
Amp it up: Introduce repetitions and/or weights to build more muscle.
Step-by-Step:
- Come to lie on your back with your legs bent, knees pointing upwards, and the soles of your feet flat on your mat.
- Extend your arms on either side of your body.
- On an inhalation, engage your glutes and push into your feet to lift your butt off the floor and hips toward the ceiling.
- On an exhalation, release your butt to the floor.
- Repeat for three sets of twelve, holding a dumbbell on your abdomen below your belly button if you want to add weights.

High Lunge Pose
Yoga Level: Intermediate
Pose Type: Standing
Why this pose: Lunges are a great way to strengthen the glutes, hamstrings, and quads.
Amp it up: Split squats in a lunge position.
Step-by-Step:
- Stand in Mountain Pose at the front of your mat.
- Step your right foot to the back of your mat, landing on the ball of your foot with your heel lifted. Keep your hips facing forward in Mountain Pose alignment.
- Bend your left knee to bring your left thigh parallel to the floor, adjusting the position of your right foot as necessary.
- Straighten your right leg.
- Take your arms overhead.
- To add dynamic movement, bend your right knee and lower into almost to the floor, then return to a lunge. Try for a set of 10 squats.
- Repeat these steps with the right foot forward and the left foot back.

Chair Pose (Utkatasana)
Sanskrit Meaning: Utkata (Powerful)
Yoga Level: Beginner
Pose Type: Standing
Why this pose: Tone your glutes, quads, shoulders, and arms with this high squat.
Amp it up: Challenge yourself to sit deeper and hold longer.
Step-by-Step:
- Stand at the front of your mat with your feet together and your arms reaching up to the ceiling.
- Bend your knees to lower your butt as if you were going to sit in a chair.
- Keeping your knees over your toes, deepen your seat, bringing your thighs close to parallel with the floor if possible.
- Continue opening your chest and reaching your arms up.
- Hold as long as you can, then straighten your legs and repeat the pose twice more.
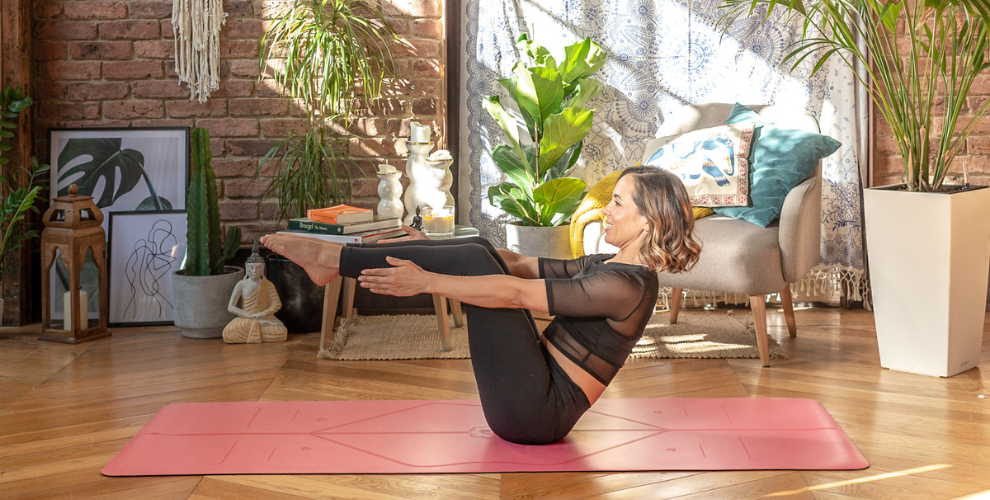
Boat Pose (Navasana)
Sanskrit Meaning: Nava (Boat)
Yoga Level: Beginner
Pose Type: Seated
Why this pose: Holding your legs and torso in a V position works your abs.
Amp it up: Move between high and low Boat for a crunch effect.
Step-by-Step:
- Come to sit on your mat with your legs bent and knees pointing upwards.
- Lean your torso back about 15 degrees.
- Lift your feet off the floor.
- Keeping your knees bent, lift your shins until they are parallel with the floor. If this makes your torso lower significantly, lower your legs a bit.
- Once you feel balanced, lift your hands and extend your arms parallel to the floor.
- Spread your toes to activate your feet.
- For Boat crunches, lower your extended legs and torso to hover a few inches above the floor, then sit back up into the Boat position. You can repeat this movement several times and also lengthen your hold time in each position.
Set the Tone
Think of toning as one of the many benefits of practising yoga, which include improved flexibility, increased well-being, and reduced stress in addition to greater strength and muscle definition. None of these can be separated or put into hierarchical order, which is brilliant news if you’ve come primarily for the muscles because you’re going to get the whole package as a bonus.